reflex-layers
Table-of-contents
- User Interface
- Textures
- Example Data
- Generating KTX files
- using powershell scripts
- Sources for Additional Content
- Electron
- Keyboard Shortcuts
- Key Bindings for loading Datasets
- Interaction Modes
- Project Setup and Development
- Known Issues
User Interface
The application features basically three visualization / interaction modes (see also Interaction Modes).
Magic Lens (single touch and multi-touch)
Displays a lens containing the layer content of the depth of the deformation at the finger position.
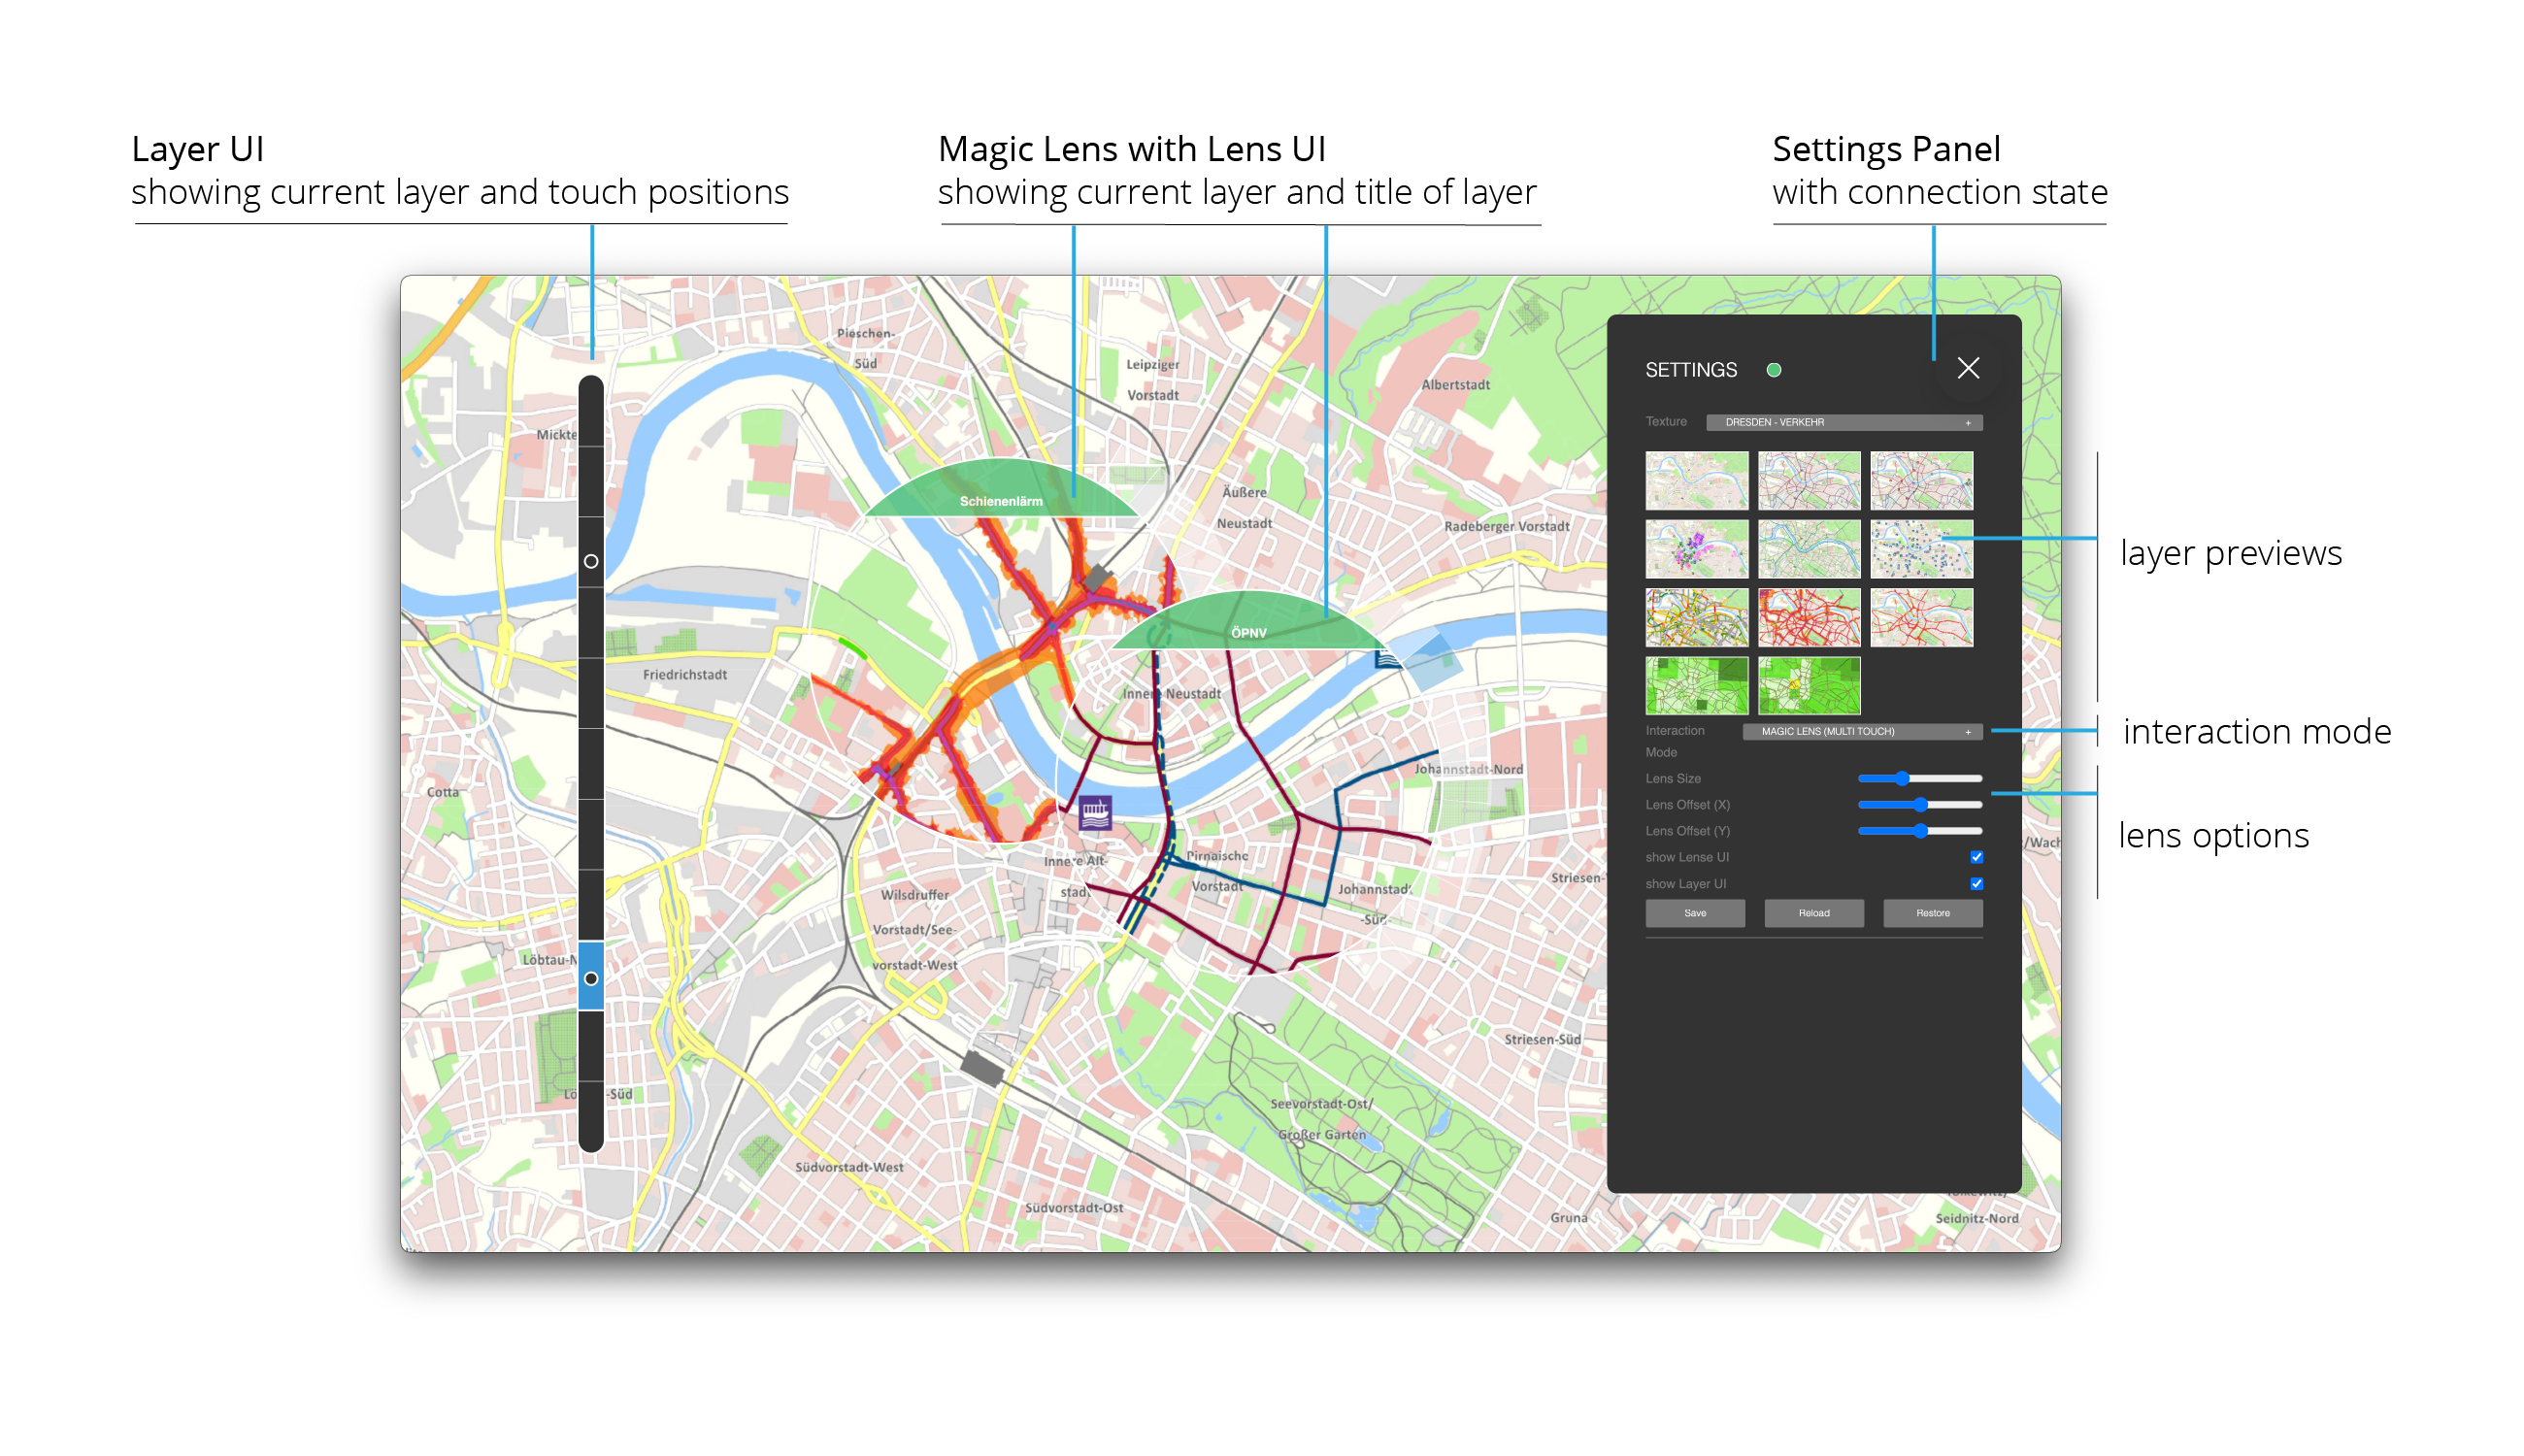
Single Touch (only one lens for the finger causing the highest deformation) and Multi-Touch (one lens for each finger) modes can be selected separately.
Lens Options include the size of the lens, an optional offset from the finger and the specification whether additional information should be displayed on the lens itself.
Layer Navigation
Displays the layer mapped to the current maximum deformation.
Pixel Blending
Maps the depth information associated to each pixel on the surface to the displayed content by blending images based on the depth value.
![]()
Pixel Blending Options include developer / debugging options, whether to interpolate depth values for smoother blending and if the sensor calibration should be applied to the depth image.
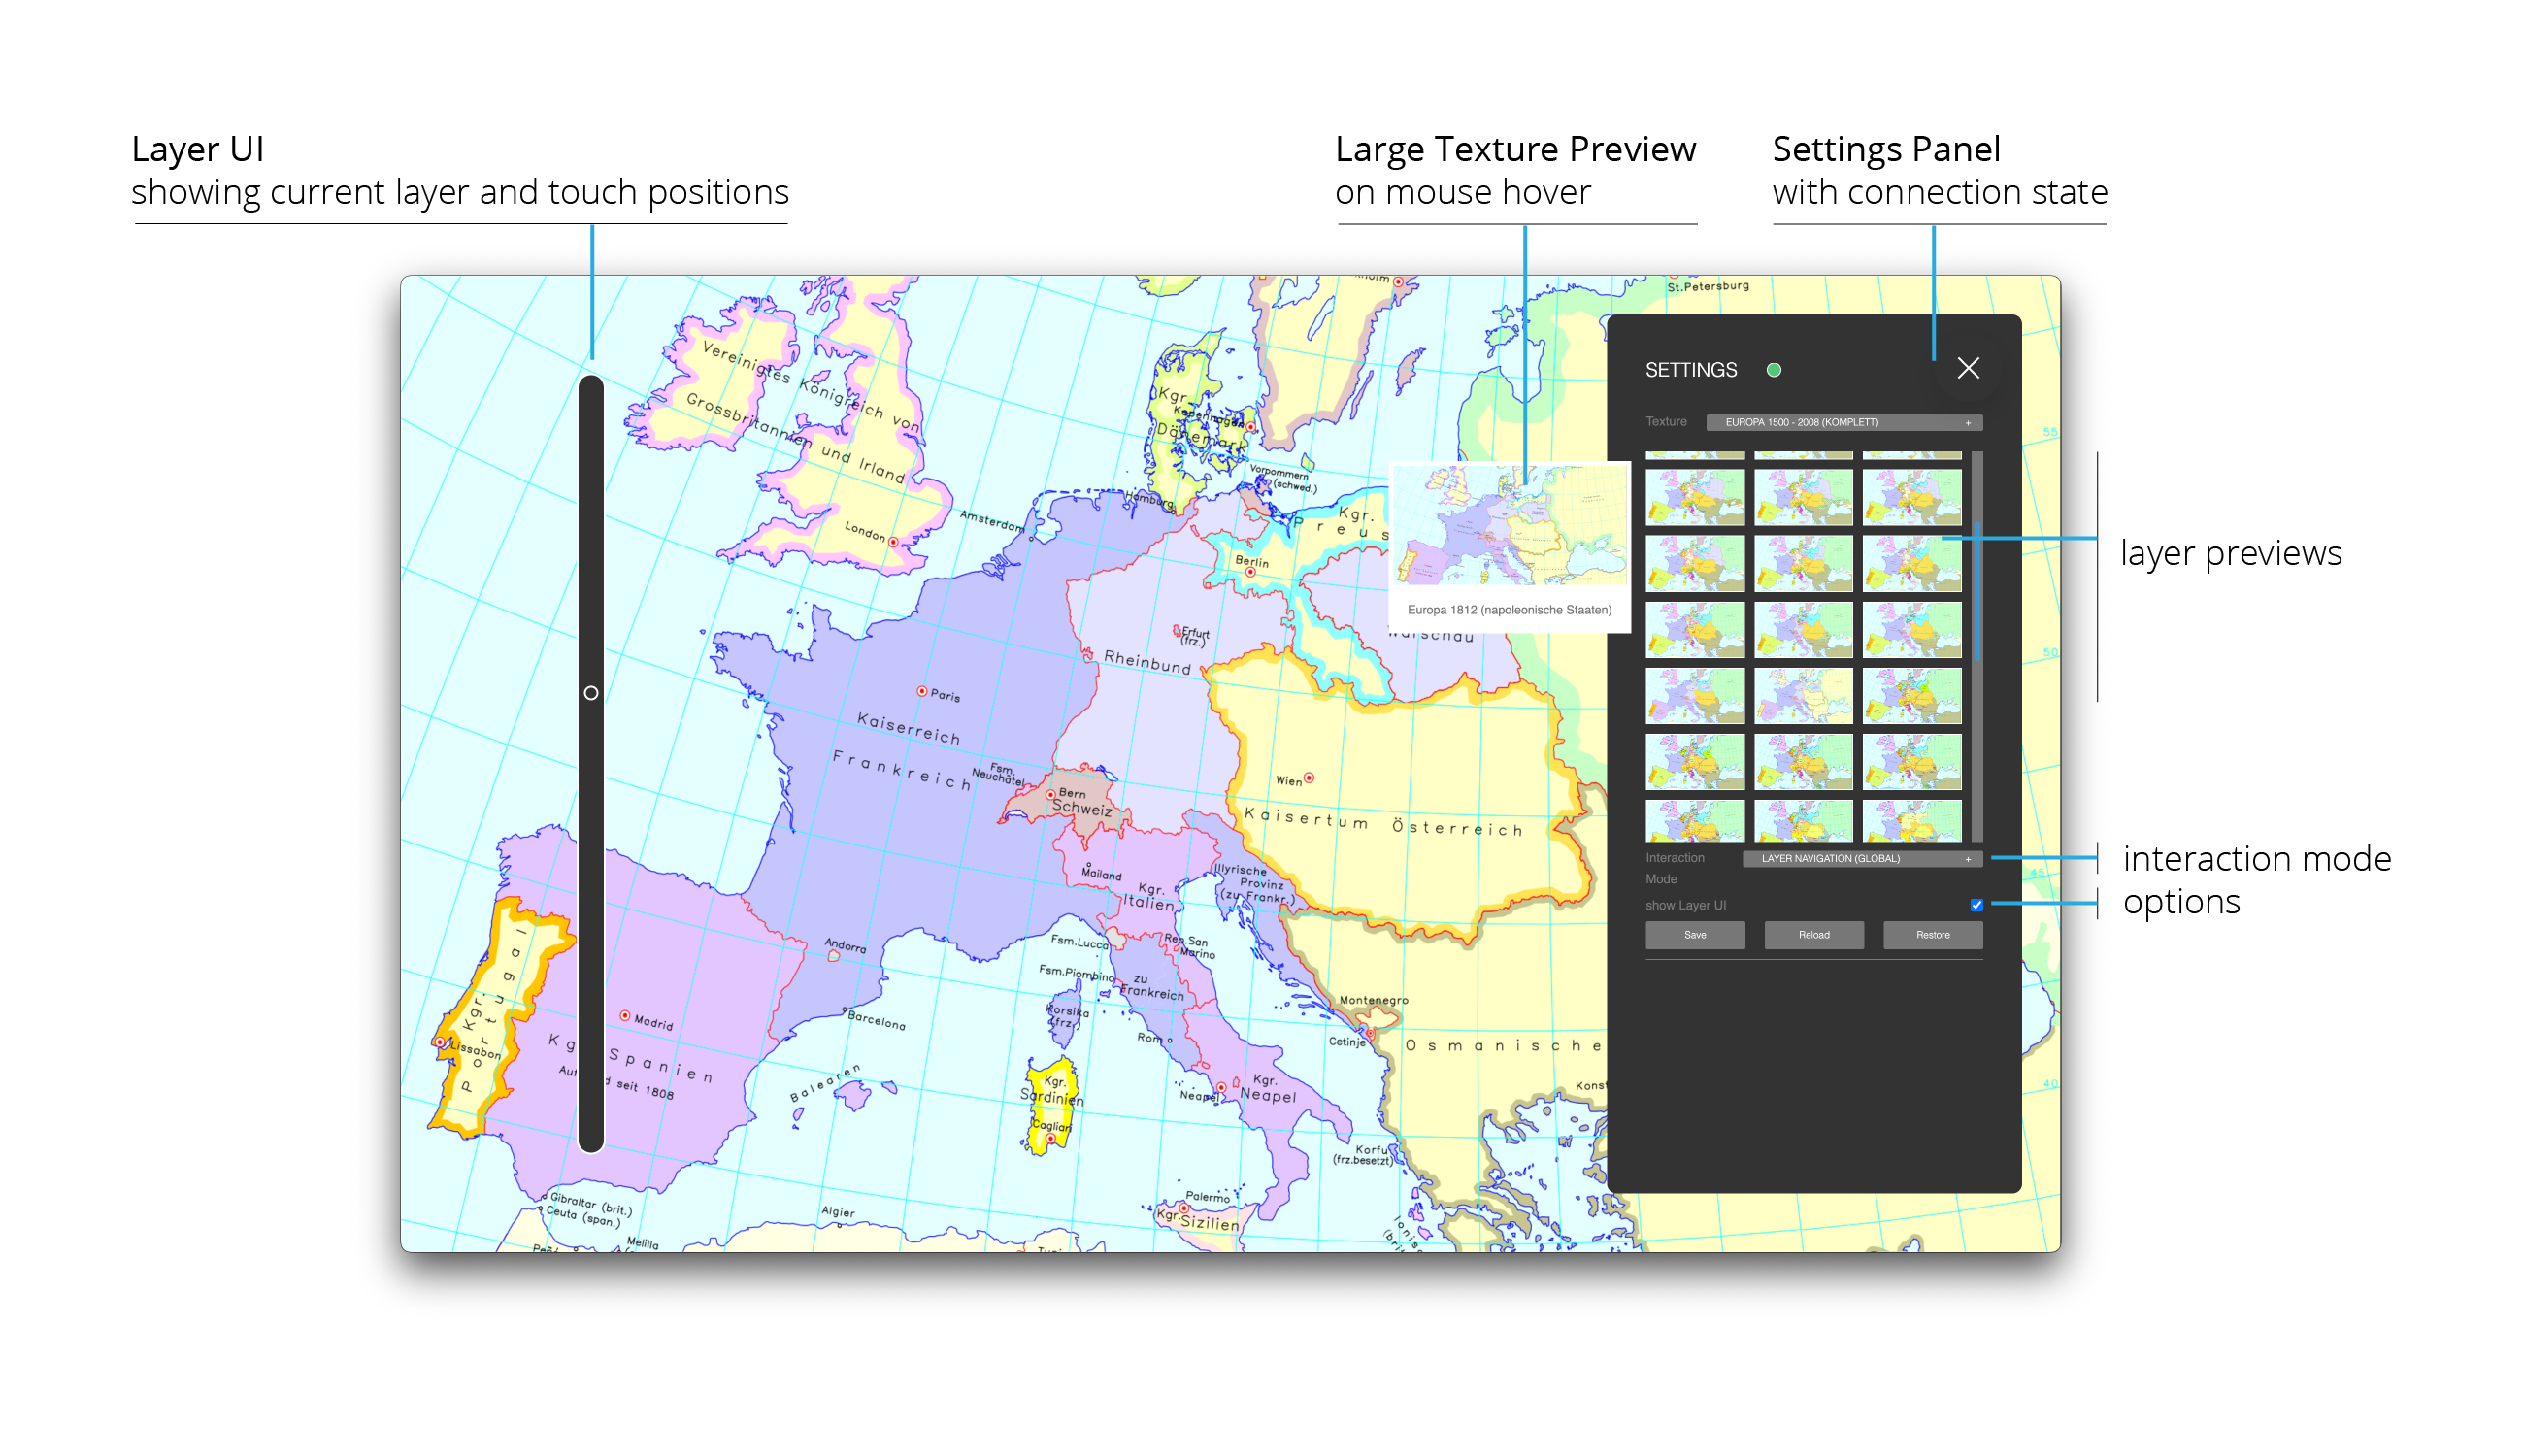
Textures
- Textures are specified in
/assets/data/data.json - Texture files need to be placed inside the
assetsfolder as angular can only access files in this folder - Textures are grouped into
TextureResourceswhich contain the data for a specific use case / scenario.
Texture Formats
Texture2D- multiple images in common file formats (preferably
pngandjpg) - constraint: maximum 15 images can be used
- multiple images in common file formats (preferably
TextureArray:- Number of images of equal size provided ina single file
- either in RAW format (raw bit data) or in
Khronos KTXtexture format, could contain 256 or more images
Texture3D:- number of images of equal size, encoded as volumetric data structure
- either in
DDSformat (raw bit data) or inKhronos KTXtexture format - REMARK: currently not working / not implemented as
three.jscan read and load DDS textures, but binding to aTexture3dis not working (it seems that three.js focuses on Texture Arrays)
Common Properties for TextureResource
id: unique identifier for loading the datasetname: displayed in the app-
type: specify Texture format:value associated format 0 Texture2d 1 TextureArray (KTX) 2 TextureArray (RAW Bytes) 3 Texture3D (DDS)4 Texture3D (KTX) folder: directory in which the files are stored, relative toassets/datalayers: Array containing the description of the texture file
Specific properties for TextureArrays
numLayers: specifies how many textures are stored in the arrayresX: width of each texture in the arrayresY: height of each texture in the array-
pixelFormat: PixelFormat used by THREE.js to interpret the binary data (only needed for raw byte data)value associated pixel format 1024 RGB 1028 RedFormat - layers should contain only a single texture
App Configuration
There is an optional parameter config that can be set for each dataset. It specifies the default settings applied when loading the dataset:
    "config": {
      // default interaction mode:
      //    0: Pixel Blending,
      //    1: Magic Lens (single touch)
      //    2: Magic Lens (multi touch)
      //    3: Layer Navigation
      "interaction": 1,
      "interpolateColor": true,
      // show layers and layer information at the lens
      "showLenseUI": true,
      // show position in the current layer on the side
      "showLayerUI": false,
      // selected mask for Magic Lens (only 3D Textures)
      "defaultLensMaskIdx": 1,
      // selected border color for Magic Lens (only 3D Textures) - RGBA (Hex)
      "lensBorderColor": "#ffff00",
      // scaling factor of lens
      "lensSize": 1.0,
      // horizontal lens offset from finger (Pixel)
      "lensOffsetX": 0.0,
      // vertical lens offset from finger (Pixel)
      "lensOffsetY": 0.0,
      // only for multi-touch Magic lenses: constrain number of available lenses
      "maxNumLenses": 1
    }
Example Data
Visible Human
- obtained from Visible Human project: National Library of Medicine
CT Head Raw TextureArray
- obtained from CodeProject article
- License: CPOL
- based on Three.js example:
Generating KTX files
- Install Khronos Texture Tools from github:
- see documentation:
- for creating a layered texture with 10 images use:
"C:\Program Files\KTX-Software\bin\toktx.exe" --t2 --encode etc1s --layers 10 output_texArray @files.txt
- creates a
output_texArray.ktx2file containing the 10 images specified infiles.txtin ktx2 format (switch--t2) - encoding
etc1sis mandatory, otherwise, the KTX Loader cannot read the file (Unsupported vkFormator KTXLoader throws a transcoding error) - Remark: texture files MUST have the resolution 1920 x 1080 pixel (if not, batch resizing using tools like Microsoft PowerToys can help overcome this issue. Resizing in kopaka1822/ImageViewer (see below) does not work, as the files cannot be transcoded properly afterwards)
- Remark: file paths in
files.txtmust be relative to the path from which the command is executed, alternatively, the prefix @@ can be used to specify file paths relative tofiles.txt - Remark: currently
KTXLoader2relies on a WASM transcoder, which needs to be configured at runtime (?). As workaround, the relevant code has been copied toassets/jsm/
See also: - Remark: current version of KTX2Loader requires KTXTools Version 4.1 or higher (current release candidate: Download)
- Remark: There seem to be issues with the color space when using KTX textures. KTX uses linear sRGB color space, Three.js assumes sRGB color space. As a result, colors are way too dark when using KTX textures. Unfortunately, there is no way to specify the color space for the compressed texture. So, the only way is to convert colors in the shader. As utility functions for these operations seem to be broken in the current THREE.js version, manual conversion is necessary in the fragment shader:
  // conversion from Linear color space to sRGB
  vec4 fromLinear(vec4 linearRGB)
  {
    bvec4 cutoff = lessThan(linearRGB, vec4(0.0031308));
    vec4 higher = vec4(1.055)*pow(linearRGB, vec4(1.0/2.4)) - vec4(0.055);
    vec4 lower = linearRGB * vec4(12.92);

    return mix(higher, lower, cutoff);
  }

  // conversion from Linear color space to sRGB
  vec4 toLinear(vec4 sRGB)
  {
    bvec4 cutoff = lessThan(sRGB, vec4(0.04045));
    vec4 higher = pow((sRGB + vec4(0.055))/vec4(1.055), vec4(2.4));
    vec4 lower = sRGB/vec4(12.92);

    return mix(higher, lower, cutoff);
  }
- Remark: there is also a good texture viewer (including KTX textures), available at github: kopaka1822/ImageViewer @ github
-
Remark: if the images contain an ICC profile, the KTX tool fails to create the TextureArray, as it cannot embed or covert ICC profile data. One workaround is to remove the ICC profile from the files. One tool which can be used for this is PNGCrush, using the command
pngcrush_1_8_11_w64.exe -ow -rem allb -reduce file.pngor in a batch file iterating over all pngs in a directory (Windows):
For /R %%i in (*.png) do pngcrush_1_8_11_w64.exe -ow -rem allb -reduce %%i
using powershell scripts
There are two PowerShell scripts provided which automate the creation of the file list and creating the ktx command.
- to create the file list, run:
.\create-file-list.ps1 -Path "textures\" -Output "output.txt"
to create the file list with the following optional parameters:
-
Path(default value:"."): the path to the texture directory relative script / current directory. -
Output(default value:"files.txt"): the name of the file in which the files will listed.
Both parameters are optional.
Remarks: Files are sorted by name (string sort)
- to create the KTX file, run:
.\create-ktx.ps1 -Path ".\test" -NumLayers 141 -ToolPath "C:\Program Files\KTX-Software\bin\toktx.exe"
with the following optional parameters:
ToolPath(default value: “C:\Program Files\KTX-Software\bin\toktx.exe”): The path where thetoktxtool is installedPath(default value: “.”): The path to the directory with the files to be listedOutput, (default value: “files.txt”,): The name of the files list (must be located in $Path)OutputFile, (default value: “output_texArray”): The name of the output fileNumLayers, (default value: 10): number of layers / textures in the file list
Sources for Additional Content
| Additional Content | Link |
|---|---|
| Dresden Hochwasser (2D/3D) | Dresden Hochwasser (arcGis) |
| Dresden Themenstadtplan | Dresden Themenstadtplan (cardo.Map) |
| Historische Karten Europa 1500 - 2008 | Digitaler Atlas zur Geschichte Europas |
| Altar von Ghent (van Eyck) [nicht freigegeben !] | Closer to van Eyck |
| Visible Human Head | National Library of Medicine |
| CT Head Raw | CodeProject article |
Electron
- application can be run as electron app using the command
npm run electron - application can be packaged as electron app using the command
npm run electron-build - resulting electron files are stored in the
releasefolder - both commands start a production build before packaging
-
IMPORTANT: Windows .exe files are limited to 2GB file size. As NSIS packages all resources into one large installer, this means that you have to be careful regarding the number of texture resources contained in the packaged installer. if the package is too large, the application is correctly built and copiend to
win-unpackeddirectory, but the installer file is corrupted and the build process fails with an error like this:File: failed creating mmap of "D:\Projekte\ReFlex\reflex-layers\reflex-layers\release\reflex-layers-0.9.0-x64.nsis.7z" Error in macro x64_app_files on macroline 1 Error in macro compute_files_for_current_arch on macroline 7 Error in macro extractEmbeddedAppPackage on macroline 8 Error in macro installApplicationFiles on macroline 79 !include: error in script: "installSection.nsh" on line 66 Error in script "<stdin>" on line 189 -- aborting creation process
Keyboard Shortcuts
The app starts in full screen mode. The following shortcuts are available:
| Shortcut | Description |
|---|---|
S |
Toggle Settings Panel |
Esc |
Close the application |
STRG + Shift + I |
open dev tools |
STRG + R |
reload app |
STRG + M |
minimize app |
F1 - F10 |
load specific Configurations (if defined, see Key Bindings) |
Key Bindings for loading Datasets
It is possible to assign Keys to specific datasets. This can be done in the assets/data/keybindings.json file. So far, only assigning keys F1 to F10 has been tested; other might work as well.
Just add a (unique) mapping between key and dataset id in the form { "key": "F6", "dataset": 8 } to the keyBindings array.
Example Config:
  {
    "keyBindings": [
      { "key": "F1", "dataset": 14 },
      { "key": "F2", "dataset": 51 },
      { "key": "F3", "dataset": 60 },
      { "key": "F4", "dataset": 4 },
      { "key": "F5", "dataset": 5 },
      { "key": "F6", "dataset": 8 },
      { "key": "F7", "dataset": 9 },
      { "key": "F8", "dataset": 15 },
      { "key": "F9", "dataset": 1 }
    ]
  }
Interaction Modes
Pixel Blending
- Blends the image based on the color value from the depth sensor
- Options:
- Stream Sensor Depth: Determine whether raw depth image is used for blending or greyscale representation of filtered PointCloud (Default: false)
- Show Depth: for debugging: show streamed depth image (Default: false)
- Interpolate colors: smooth depth image fpr reducing artefacts (Default: true)
- Overrride Depth: for debugging: manually set depth value (full screen) (Default: false)
- Min Depth Value: greyscale value mapped to deepest point (Default: 0.0)
- Zero Depth Value: greyscale value mapped to zero plane point (Default: 0.5)
- Apply Calibration: transform depth image based on the translate/scale values derived from the coordinate mapping between sensor and interaction space (Default: true). If this is not set, depth image is stretched to fill the screen space
Magic Lens (Single or Multi-Touch)
- Displays a lens at the finger position containing the content based on the deformation at the fingertip
- In Single-touch mode, the first touch is used to determine the lens position, in multi-touch mode, a lens for every finger is displayed
- Options:
- Lens Size: Scaling factor for the lens (Default: 1.0)
- Lens Offset X: move the lens from the fingertips in horizontal direction (Default: 0.0)
- Lens Offset Y: move the lens from the fingertips in vertical direction (Default: 0.0)
- Show Lens UI: show current layer at the border of the lens (Default: true)
- Show Layer UI: show layers and current position of the lenses at the side of the screen (Default: true)
Layer Navigation
- go through layers by deforming the screen, complete layer is displayed based on the deepest finger position
- Options:
- Show Layer UI: show layers and current position at the side of the screen (Default: true)
When using KTX-Arrays, Lens Modes offer an additional option to specify the lens mask. his can be customized to achieve effects such as a fisheye effect. Also, the border color of the lens can be specified.
Project Setup and Development
This project was generated with Angular CLI version 17.3.11.
Run npm install in directory reflex-layers to install node packages.
Code Scaffolding
Run ng generate component component-name to generate a new component. You can also use ng generate directive|pipe|service|class|guard|interface|enum|module.
NPM Commands
| Command | Description |
|---|---|
start |
starts the Angular app on port 4302 |
start:electron |
starts the app as packaged electron application |
watch |
starts the Angular app on port 4302 in watch mode |
build |
builds the Angular app |
build:electron |
builds and packages the app as electron application (Target: Win) |
test |
executes unit tests via Karma |
Further Help
To get more help on the Angular CLI use ng help or go check out the Angular CLI Overview and Command Reference page.
Known Issues
- updating Electron to Version 31.0.0 resulted in an error in the
KTX2Loaderresponsible for loading KTX Textures. The errorRequest is not defined(in the implementation of theload()function) is thrown when loading textures (maybe due to a removed node package in Electron).