
Template: Unity
Table of contents
- Basic example
- Setup and configuration
- Components and interaction data
- Receiving interactions in a custom scene
- Visualization and status overlay
- Updating the ReFlex library
Basic example
- location:
examples/unity-signal-r/ - Unity project:
examples/unity-signal-r/ReFlex-SignalR/ - technology: Unity, C# MonoBehaviour components, WebSocketSharp and Newtonsoft.Json
- example scene:
Assets/Scenes/ReFlex-Sample-WebSockets.unity - default websocket address:
ws://localhost:40001/ReFlex - Features:
- connects to the ReFlex server and deserializes incoming interaction data
- stores the current interactions and exposes an update event to other components
- provides a debug overlay showing connection state, address and interaction points
- includes reusable prefabs for the connection and visualization
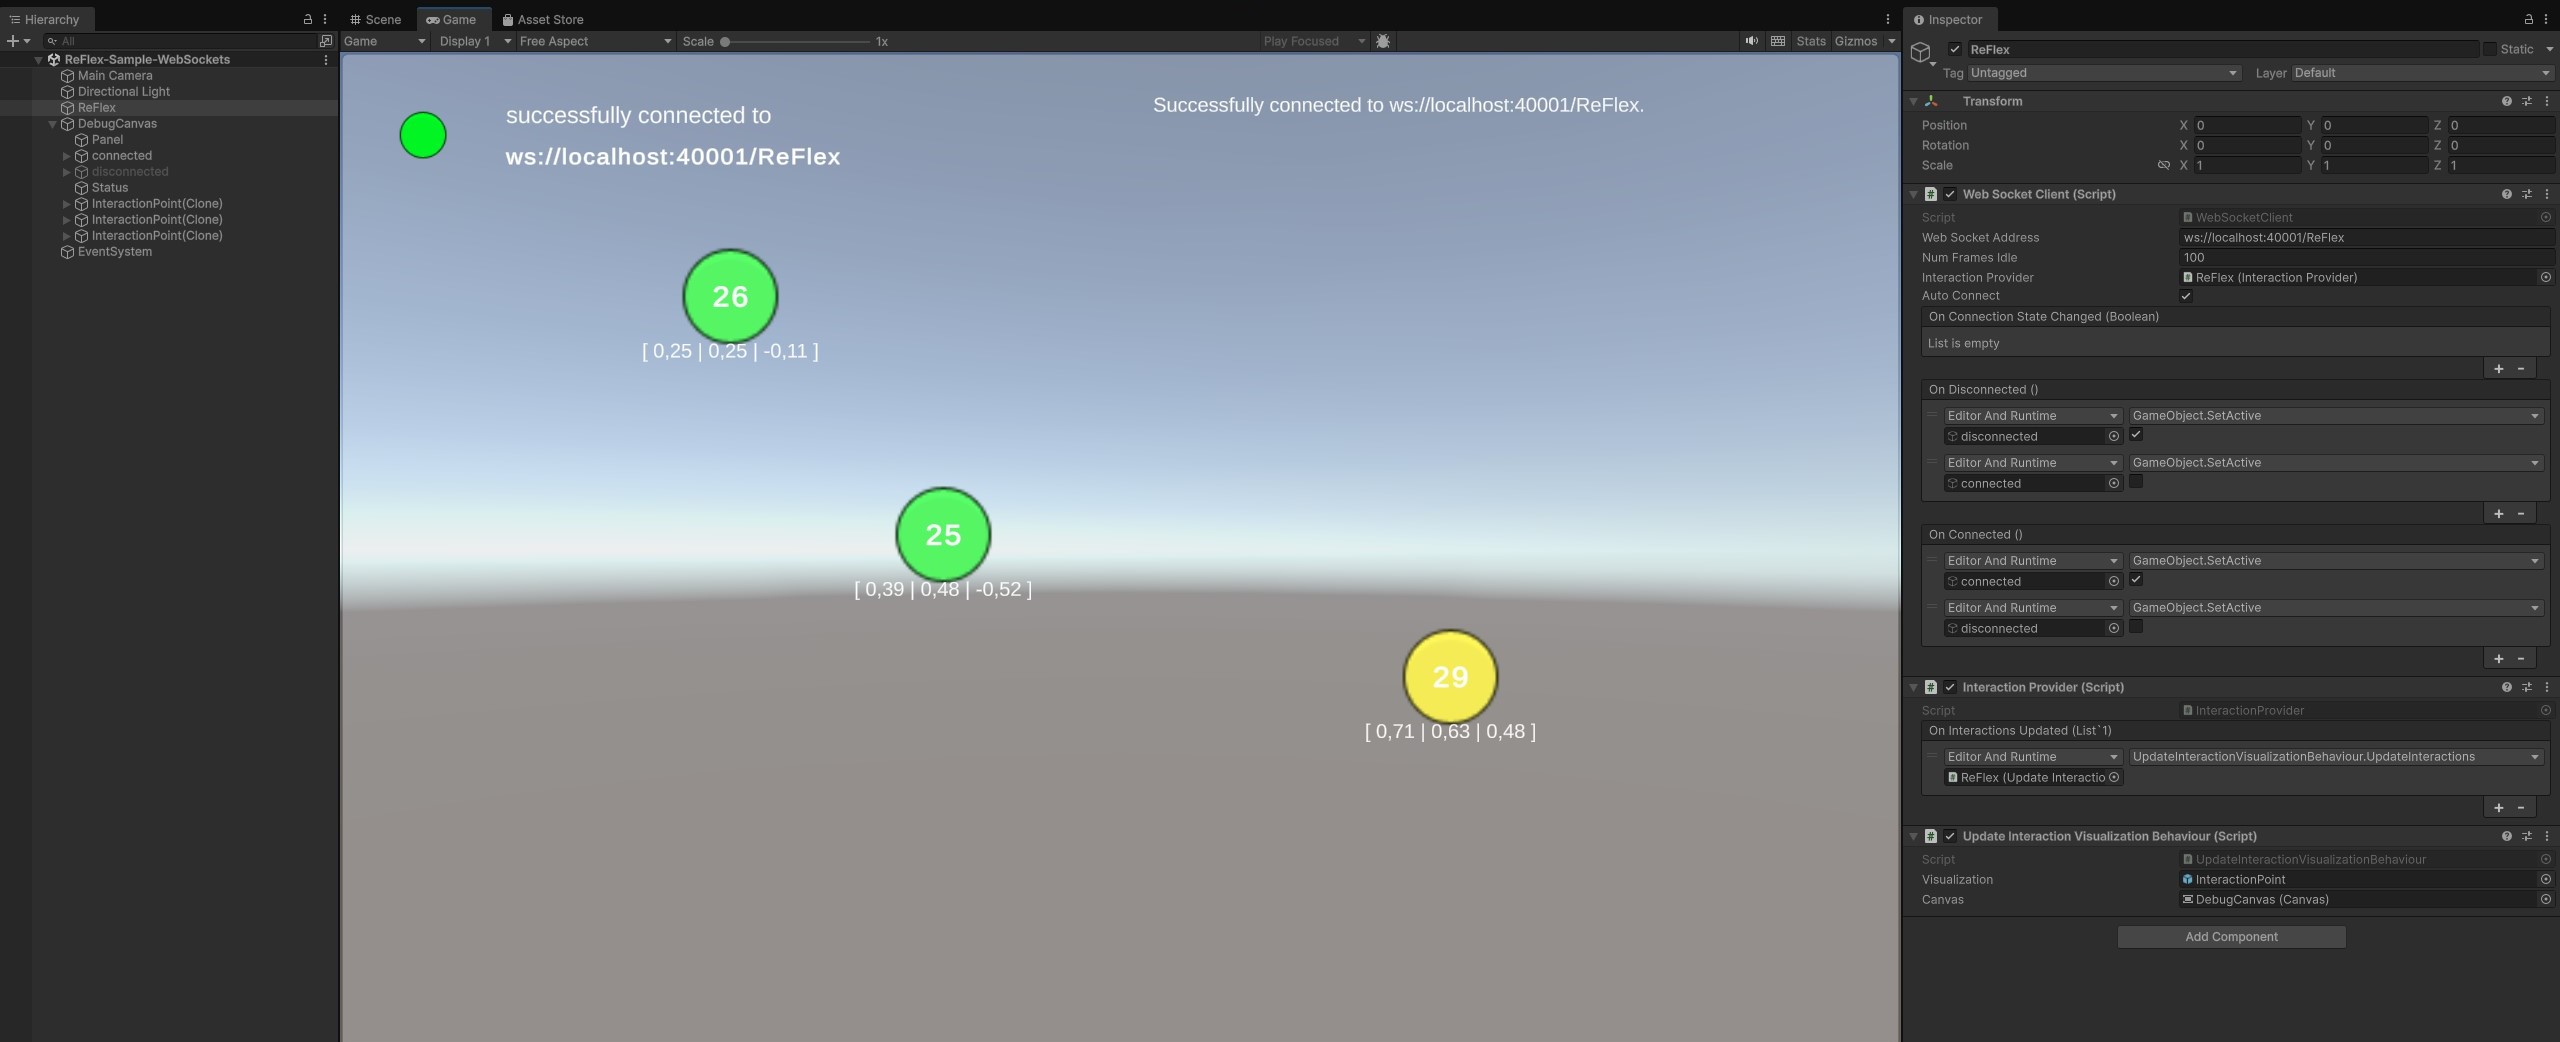
The template demonstrates how to integrate Elastic Display input into a Unity application. Unity’s component system lets scripts derived from MonoBehaviour add behavior to scene objects. The ReFlex integration follows this model: separate components handle the connection, cache interaction data and optionally visualize it. Since Unity uses C#, the template reuses the framework’s .NET data types through ReFlex.Core.Common.
The directory and project retain their historical SignalR names, and SignalR packages remain in the dependency configuration. The supplied scene and WebSocketClient script use the server’s WebSocket interface directly; the example does not implement a SignalR client workflow.
Setup and configuration
Requirements
The project records Unity 6000.0.53f1 in ProjectSettings/ProjectVersion.txt. The original development setup recommends JetBrains Rider 2025.1.3 as an IDE. The main dependencies listed in Assets/packages.config are:
| Package | Version | Use in the supplied project |
|---|---|---|
WebSocketSharp-netstandard |
1.0.1 |
WebSocket connection and callbacks. |
Newtonsoft.Json |
13.0.3 |
Deserialization of interaction messages. |
Microsoft.AspNetCore.SignalR.Client |
7.0.5 |
Retained dependency; the supplied connection script uses WebSocketSharp. |
Microsoft.Extensions.DependencyInjection.Abstractions |
7.0.0 |
Listed dependency. |
System.Configuration.ConfigurationManager |
7.0.0 |
Listed dependency. |
Assets/packages.config also lists the associated transitive dependencies. The ReFlex data types are provided by Assets/ReFlex.Core.Common.dll; the original example identifies this assembly as version 0.9.9.
For restoring the NuGet dependencies, the original setup recommends NuGetForUnity. To install it through Unity’s Package Manager, choose Add package from git URL… from the + menu and enter:
https://github.com/GlitchEnzo/NuGetForUnity.git?path=/src/NuGetForUnityRestore the packages from Assets/packages.config before running the example. The versions above describe the supplied project; when updating the ReFlex assembly, also check its dependency versions as described below.
Starting the example
- Open
examples/unity-signal-r/ReFlex-SignalR/as a project in the matching Unity editor. - Restore the required packages and resolve any missing assembly references.
- Open
Assets/Scenes/ReFlex-Sample-WebSockets.unity. - Start the ReFlex server and enable websocket broadcasting. See the server networking view.
- Select the
ReFlexGameObject and configure Web Socket Address on itsWebSocketClientcomponent to match the server endpoint. - Enter Play mode. The component attempts to connect in
Start(), and the debug canvas displays the connection status and received interactions.
The Auto Connect field controls reconnection after error and close callbacks. It does not disable the initial connection attempt. Reconnection uses a coroutine with WaitForSeconds(3); this is a retry delay, rather than a websocket connection timeout.
Components and interaction data
The main scripts are in Assets/Scripts/ReFlex/:
| Component | Purpose |
|---|---|
WebSocketClient |
Opens the websocket, handles connection events and deserializes each message with JsonConvert.DeserializeObject<List<Interaction>>(e.Data). It passes the result to the assigned InteractionProvider. |
InteractionProvider |
Caches the current interaction list and notifies subscribers through onInteractionsUpdated. |
overlay/UpdateInteractionVisualizationBehaviour |
Optional visualization component. Receives interaction updates and creates or replaces the point prefabs in its Update() method. |
Interaction comes from ReFlex.Core.Common.Components. It includes TouchId, Position, Confidence, Type, ExtremumDescription and Time. See Interactions Format for the server payload and normalized coordinates.
Connection state
The public API of WebSocketClient includes:
| Member | Type | Purpose |
|---|---|---|
Address |
string |
Configured websocket endpoint. |
IsConnected |
bool |
Locally maintained connection state; see the idle-counter limitation below. |
StatusMsg |
string |
Most recent status or error message. |
onConnectionStateChanged |
WebSocketConnectionStateChangedEvent (UnityEvent<bool>) |
Reports the new state when the websocket opens, closes or reports an error. |
onConnected |
UnityEvent |
Invoked when the connection opens. |
onDisconnected |
UnityEvent |
Invoked when the connection closes or reports an error. |
Connection methods are private in this implementation; endpoint and retry configuration are exposed as serialized Inspector fields.
Interaction cache and event
InteractionProvider.CurrentInteractions exposes a List<Interaction> containing the latest received data. UpdateInteractions clears the previous contents, copies in the new list and invokes onInteractionsUpdated. The event type, defined in events/InteractionsUpdatedEvent.cs, is:
1
2
3
4
[Serializable]
public class InteractionsUpdatedEvent : UnityEvent<List<Interaction>>
{
}
ClearInteractions() clears the cache without notifying subscribers by default. Call ClearInteractions(true) to propagate the empty list through the update event. The cache is a mutable list reused across updates; consumers that need a snapshot should copy its contents.
Receiving interactions in a custom scene
- Drag
Assets/Prefab/ReFlex.prefabinto the scene. Alternatively, add bothWebSocketClientandInteractionProviderto a GameObject and assign the provider to the connection component’s Interaction Provider field. - Configure the websocket address and whether automatic reconnection should be attempted.
- Add a handler to the provider’s
onInteractionsUpdatedevent, either in the Inspector or throughAddListenerin a script. - Use the received interaction list to update application state, then apply scene changes on Unity’s main thread.
Main-thread processing
WebSocket callbacks can run outside Unity’s main thread, and InteractionProvider invokes its event directly from the receive path. Do not instantiate or modify GameObjects directly in these event handlers. Schedule that work for the main thread, for example through a thread-safe queue drained in Update().
The supplied UpdateInteractionVisualizationBehaviour illustrates deferred processing: its UpdateInteractions handler copies the interactions into a local list and sets _needsUpdate; Update() performs the visualization changes when that flag is set. This moves GameObject creation to the main thread, but the shared list and flag are not synchronized. For production use, protect the handoff between threads or use a thread-safe queue. Polling CurrentInteractions also needs appropriate synchronization if it is being updated concurrently.
Visualization and status overlay
The supplied scene contains a ReFlex GameObject for communication and a DebugCanvas for the full-screen overlay. The reusable prefabs are:
Prefab (relative to Assets/) |
Purpose |
|---|---|
Prefab/ReFlex.prefab |
Connection and interaction cache components, with the provider reference assigned. |
Prefab/overlay/DebugCanvas.prefab |
Connection state, status message and address display. |
Prefab/overlay/InteractionPoint.prefab |
Visual representation of an individual interaction. |
To add point visualization to a custom scene:
- Add the debug canvas or create a Canvas using Screen Space - Overlay.
- Add
UpdateInteractionVisualizationBehaviourto a GameObject. - Assign
Prefab/overlay/InteractionPointto its Visualization field and the target Canvas to its Canvas field. - Bind
InteractionProvider.onInteractionsUpdatedto the visualization component’sUpdateInteractionsmethod. Reassign scene references for the status and address components when reusing the overlay prefab.
For each update, the visualization destroys the previously created point objects and instantiates one prefab per interaction. It maps normalized positions to canvas coordinates using x = width * Position.X and y = height * (1 - Position.Y), accounting for Unity’s vertical canvas direction.
DisplayInteractionElementBehaviour sets the coordinate and touch-ID labels. It selects push, pull or undefined visuals from ExtremumDescription.Type (Minimum, Maximum or Undefined). The point scale is calculated as 0.8 + (Confidence % 50) * 0.04, so it represents confidence through a repeating scale rather than deformation depth. The depth value is included in the coordinate label.
UpdateStatusMessageBehaviour reads StatusMsg, and the class UpdateAddressScript in UpdateAddressTextBehaviour.cs reads the configured Address for the TextMesh Pro display.
The integration can be reused through these prefabs and exported with its scripts, assets and required assemblies as a Unity package for other projects.
Updating the ReFlex library
Use the .NET Standard 2.1 build of ReFlex.Core.Common for this Unity integration. The library project at library/src/Core/Common/Common.csproj is configured to target both .NET 8 and .NET Standard 2.1:
1
<TargetFrameworks>net8.0;netstandard2.1</TargetFrameworks>
With the .NET SDK installed, build the compatible target from the repository root:
1
dotnet build library/src/Core/Common/Common.csproj --configuration Release --framework netstandard2.1
Replace Assets/ReFlex.Core.Common.dll with the assembly from the netstandard2.1 build output and provide its required runtime dependencies. Check those dependencies against Assets/packages.config: the current library source references newer package versions than the Unity example. Its package version is 1.0.0, while its assembly and file versions remain 0.9.9.
When adding other ReFlex libraries, verify that they and their dependencies support a Unity-compatible target framework. Adding a target framework entry alone does not make incompatible APIs available in Unity.